TouchBistro POS
Accurate sales, labor data tracking, and tip pooling is at your fingertips with the Touchbistro POS integration in 7shifts! This connection provides the insights needed to build high-performing schedules while ensuring your team stays aligned with labor targets through real-time data and schedule enforcement.
In this article
Add the TouchBistro integration
Employee Mapping
Actual Sales and Forecasting
Actual Labor and Tips
Schedule Enforcement
Employee Sync
Syncing Wages
Things to Know
Review these critical technical requirements before enabling the integration:
- Access to certain features may require a plan upgrade.
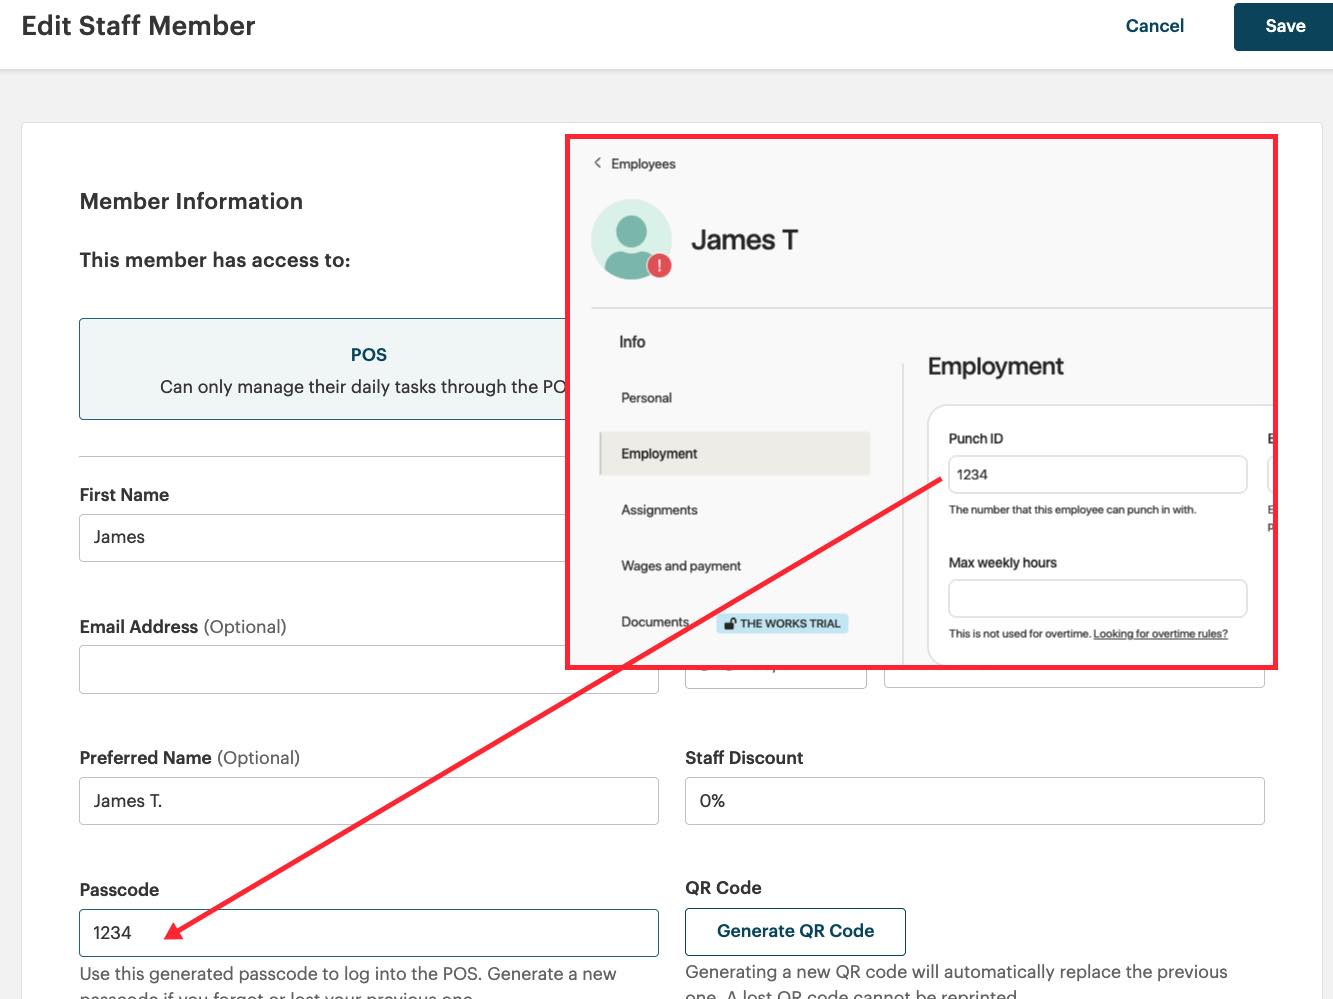
- To ensure employees can clock in, the Punch ID in 7shifts must match their TouchBistro passcode.
- Mapping is the foundation of your integration. It must be completed before enabling Employee Sync, Actual Labor, or Wage Sync to ensure your labor data and payroll exports are accurate.
Add the TouchBistro integration
To enable the TouchBistro integration (and Schedule Enforcement), follow these steps:
- Log into your TouchBistro cloud site.
- In the left navigation bar, select App Marketplace.
- Under 7shifts, click Set Up.
- Click Login to 7shifts and use your 7shifts login credentials (you must be logged in as an Admin).
- Authorize the integration by clicking Grant Access.
- After authorization, return to your TouchBistro cloud. Select your location from the 7shifts Location ID drop-down box. You need to do this even if you only have one location:
-
(Optional) Choose to enable Enforce Schedule, Enforce Role, or Allow Shift Override:
-
Enforce Schedule: Requires employees to be scheduled in 7shifts to clock in.
In 7shifts, you'll also need to enable Schedule enforcement (Integrations > My Integrations > TouchBistro POS > Settings). Click on the slider to turn it on and click on the dropdown to select the grace period. This allows employees to clock in within that grace period based on their scheduled shift.Example: If your employee is scheduled at 9:00 am and your grace period is 10 minutes, the employee can clock in as early as 8:50 am.
- Enforce Role: Requires the scheduled Role in 7shifts to match the Role being clocked in.
- Allow Shift Override: Allows managers/admins to override a non-scheduled punch using their POS passcode (must be enabled in their 7shifts Role permissions).
-
- For every employee who needs to be able to clock in using Touchbistro POS, the Punch ID within 7shifts matches their Touchbistro passcode.
The Punch ID field in 7shifts can be found by navigating to the Team> Employees > Employee Profile > Employment.
Here's how it works with Enforce Schedule and Role enabled: Staff will punch in on the TouchBistro POS. TouchBistro then sends the punch over to 7shifts to see if this Employee is scheduled to work and can punch in. If the Employee isn't scheduled to work in 7shifts, they will not be allowed to clock in. If they are scheduled to work, they will be allowed to punch in. - Be sure to hit Save once you’re done.
- Success! Moving forward, you'll be able to view the integration within your 7shifts account by heading to Integrations > My Integrations > Touchbistro POS > Settings.
After you've activated the integration, it may take several hours for the system to start bringing in your previous sales data.
If you have more than one location using TouchBistro, repeat the connection steps for each new location, starting from Step 1, Point 6 above.
Each location must be connected separately from the TouchBistro Cloud App Marketplace. When prompted, copy the corresponding Location ID from 7shifts and enter it into the TouchBistro Cloud enablement page. Failure to follow these steps will result in the error message "unable to validate credentials".
Employee Mapping
Mapping connects users and roles between your POS and 7shifts to ensure labor data flows to the correct profiles. When your roles and employees are correctly mapped, it reduces integration warnings and prevents issues when running payroll. You can leverage 7shifts reporting and analytics tools to help you make informed decisions and track your business needs.en running payroll.
Important: Employees must clock in and out on TouchBistro at least once before they will appear on the 7shifts mapping page.
To map your employees:
- Head to Integrations > Mapping > Employees.
- Review the Matched list for automated pairings based on name and email.
- For Unmatched staff, choose to Match, Ignore, or Add them to 7shifts.
See Employee Mapping for universal setup rules and mapping logic.
Managing Staff Passcodes, Punch IDs, and Types
To ensure consistent employee data, matching is done in Touchbistro by ensuring the Scheduling Integration Name within each Staff Type matches the name of the Role in 7shifts.
- In TouchBistro, go to Admin > Admin Settings > Staff > List of Staff.
- Ensure the TouchBistro staff passcodes ( Admin > Admin Settings > Staff > List of Staff) match the 7shifts employee punch IDs (Team > Employee Profile > Employment):
- Visit each Staff Type in TouchBistro and ensure the 7shifts Integration Name field matches the Role name used in 7shifts exactly:
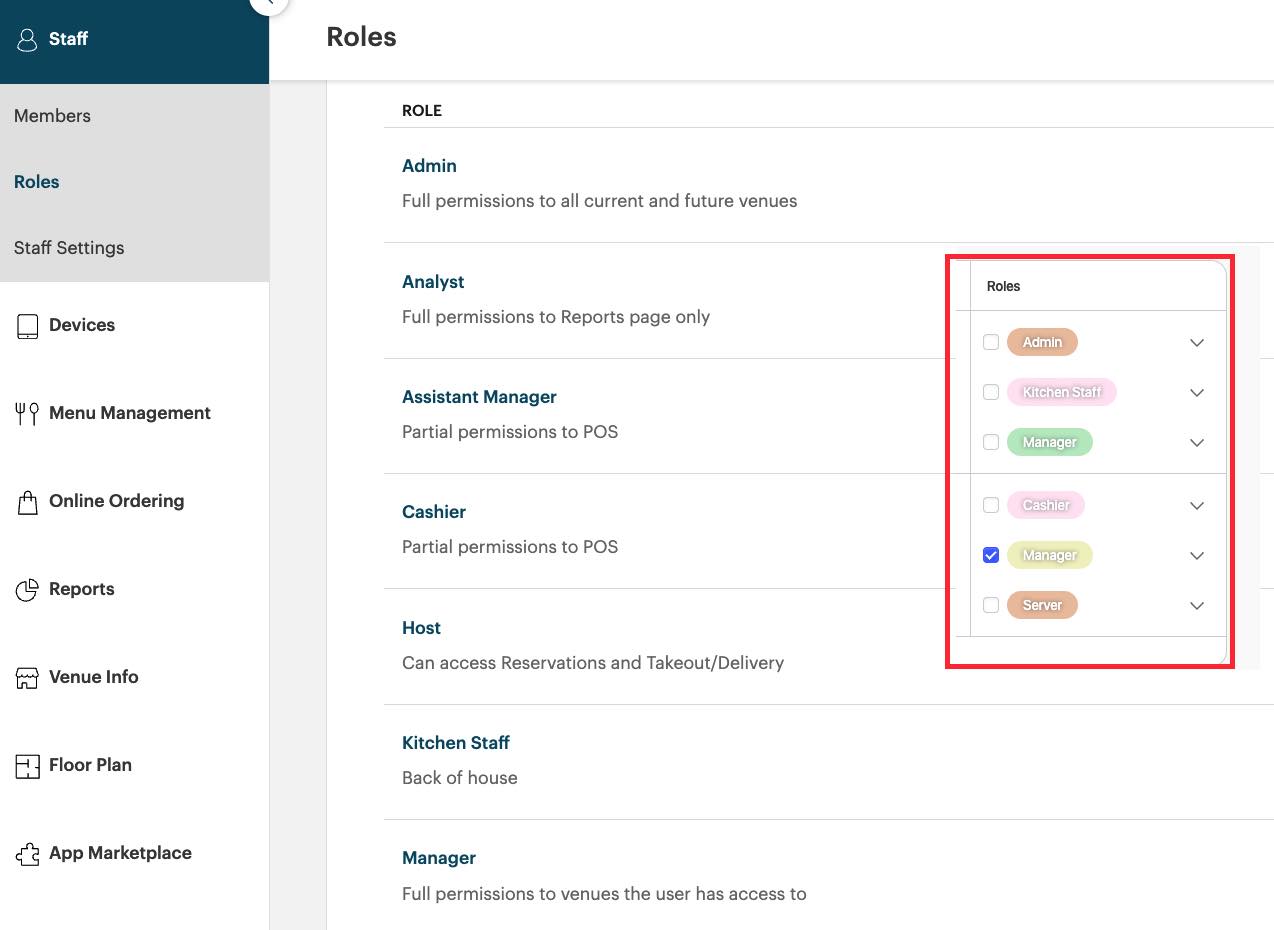
For example, if Staff Type and Role are both Waiters, enter Waiter in the 7shifts Integration Name field.
If you have multiple Staff Types in TouchBistro with slightly different rights but in 7shifts you have one catch-all role, enter the 7shifts Role in each of the Staff Type's 7shifts Integration Name field.
For example, on 7shifts you have a catch-all Waiter role. However, on TouchBistro you have a Waiter staff type and a Head Waiter staff type. The Head Waiter staff type has a few additional managerial rights set.
However, for 7shifts purposes, any staff member with the Head Waiter staff type is simply assigned the Waiter role. In TouchBistro, open the Waiter staff type and the Head Waiter staff type and set the 7shifts Integration Name field in both to Waiter.
Actual Sales and Forecasting
Real-time sales data integration is enabled by default upon activation and is used to generate labor budget projections. Once connected, 7shifts pulls Net sales data from TouchBistro.
- 7shifts automatically imports up to 90 days of historical sales data from TouchBistro upon activation.
- It may take hours for the system to start bringing in your previous sales. If they do not appear initially, please check back in a few hours.
- Both 7shifts and TouchBistro POS must be configured with the same time zone and workday hours (5:00 AM to 5:00 AM).
- It takes approximately 1–2 weeks of data collection for initial sales projections to appear.
Actual Sales and Forecasting in 7shifts defines universal rules and how projection logic applies across all supported integrations.
Actual Labor and Tip Management
As labor data syncs from the POS, 7shifts pulls employee punches and labor costs to support accurate reporting, tip calculations, and payroll workflows. Once enabled, actual labor totals are displayed on the Dashboard, allowing you to compare sales vs. labor. Tips are managed alongside actual labor in 7shifts because they are earned during worked time and associated with employee punches. Tip Management and your POS integration work together to ensure:
- Labor data define who worked and when
- Tip data define what was earned
- Tip calculations define how earning are redistributed and paid
Important: TouchBistro does not support role mapping. Labor data will populate in 7shifts based on the scheduled Role for that shift.
To enable labor sync:
- Head to Integrations > My Integrations > TouchBistro POS > Settings.
- Under the Labor tab, toggle on Actual Labor.
- Click Save.
- Punches for unscheduled shifts will appear in 7shifts without an assigned Role.
- Paid and unpaid breaks are not currently synced from TouchBistro to 7shifts.
Syncing POS time clocking data defines universal rules and how labor data from external systems is managed.
How Tip Data Syncs from Touchbistro
The TouchBistro integration supports the collection of the following tip sources:
- CC Tips (Credit Card Tips)
- Auto-gratuity
- Cash Tips
- Declared Tips
Tip: It is recommended to configure these settings after your initial integration setup is complete and your first sync has occurred. This ensures 7shifts accurately recognizes all available tip sources from your POS.
Using Tips with Tip Pooling
The integration supports automated tip collection for use with 7shifts Tip Pooling. Tip sources can be used with 7shifts Tip Pooling to create custom distribution rules based on hours worked, points, or percentages.
Including Tips in Payroll
To ensure these tips are included in your reports and payroll (7shifts Payroll and external exports), you must configure your tip calculation settings. Follow the steps in Tip Management: Include Tip Calculations. The formula you set determines:
- Which tips are includes
- How they are calculated
- How they appear in reports and payroll exports
Tip Management & Integrations defines the universal rules for including tip data from your POS in 7shifts.
Schedule Enforcement
Schedule Enforcement ensures staff can only clock into TouchBistro when they have a scheduled shift in 7shifts.
Note: If an employee is not scheduled, a manager override on the POS terminal is required to allow the clock-in.
To enable this feature:
- In 7shifts, go to Integrations > My Integrations > TouchBistro POS > Settings.
- Ensure Actual Labor and Employee Sync are enabled.
- Next, head to the Labor tab.
- Toggle on Schedule Enforcement and select your desired grace period.
- In the TouchBistro Cloud App Marketplace settings for 7shifts, enable Enforce Schedule.
- Republish your 7shifts schedule to send shift data to TouchBistro (simply make a small adjustment to a shift, save, undo the change, save again, and Publish).
See Schedule Enforcement for universal rules and requirements.
Employee Sync
7shifts can automatically create new employee profiles when they are added to TouchBistro POS. Employee Sync also helps ensure your employee records match in both systems, so your labor data is always up to date in 7shifts.
Important: Actual Labor must be enabled and existing employees/roles must be mapped before using this feature.
To enable Employee sync:
- Go to Integrations > My Integrations > TouchBistro POS > Settings > Employee Data.
- Toggle on Employee Sync.
- Synced fields include: First Name and Last Name.
- Note: TouchBistro users sync to 7shifts only after they have clocked in and out at least once.
- Email addresses and Role assignments do not sync; these must be added manually in 7shifts.
- Archiving an employee in TouchBistro will deactivate their 7shifts account.
See Employee Sync for the universal automation rules for syncing user profiles.
Syncing Wages
You can set employee wages in 7shifts to sync automatically with the rates defined in Touchbistro. This ensures your labor cost calculations in 7shifts remain accurate without manual updates.
Important: Prior to syncing wages, you must enable Wage-Based Roles and have properly mapped your Roles/Staff Types.
Wage Sync imports wages only for hourly roles; salaried positions are not supported.
To enable Wage Sync:
- Go to Integrations > My Integrations > TouchBistro > Settings > Employee Data.
- Toggle on Wage Sync.
- Wage Sync imports wages only for hourly roles; salaried positions are not supported.
Wage Sync in 7shifts defines the universal rules for syncing employee wage rates.
Unlinking TouchBistro from 7shifts
If you need to unlink TouchBistro (e.g., to change the linked 7shifts account):
- In TouchBistro Cloud, click Unlink 7shifts Account.
- Click Unlink Accounts to confirm.
- You will be prompted to log in again with the new credentials.
Next Steps
Review the Warnings tab
The Warnings tab in Time Clocking is your final checkpoint for data accuracy. Before closing a pay period, use this tab to identify and resolve discrepancies between your time clocking source (such as 7punches or your POS) and your payroll exports.
Complete mappings is the foundation for reliable data and labor reporting. By reviewing this tab regularly, you can identify and resolve discrepancies (such as missing punches, unmapped employees, or role mismatches) before they reach payroll.
Understanding Integration Warnings in Time Clocking provide an overview of navigating the warnings tab.